
A game by Tamtex and Irem for NES, originally released in 1991.

Metal Storm was never a terribly popular game, despite the fact that it was published by Irem, the company behind R-Type and a longtime publisher/developer of games on the NES. The game also did not benefit much from its 12-page cover story in Nintendo Power.
 Many developers, even in the 8-bit era, toyed with gravity flip mechanics, but few built their entire games around them. Generally, gravity-based gameplay was limited to a particular section of the game, such as Mega Man 5’s Gravity Man stage, and Shatterhand’s Anti-Gravity Research Center.
Gravity flipping has become much more common recently with the indie development scene, with games such as VVVVVV building the entirety of its gameplay around this.
Metal Storm was actually released in the U.S. first, in 1991. The Japanese version, titled Jūryoku Sōkō Metaru Sutōmu (Gravity Armor Metal Storm) was released in the following year. There are a few minor differences between the two versions. The mech in the U.S. version is called the M-308 Gunner, where it is known as the Storm Gunner M-308 Custom in the Japanese version, and the powerups have different names as well. Also, the Japanese version has an extended introduction sequence that shows the backstory, whereas this is relegated entirely to the instruction manual in the U.S. version (see PREMISE section below). Interestingly, the color palette is different as well, with the Japanese version featuring a lighter-colored mech and environments than in the U.S. version.
PREMISE
From the instruction manual:
The year is 2501, and the dawning of a new century has brought mankind to the brink of disaster. The powerful LaserGun on the planet Pluto's battle station "Cyberg" is wreaking havoc. It was originally designed to protect Earth from hostile aliens, but, due to a computer malfunction, is systematically destroying all the planets in the Solar System! Most recently the Earth Nation watched helplessly as Neptune exploded.
The system's self-destruct device could stop the LaserGun, but it has mysteriously jammed and is aimed at Earth. Even if the device can be manually activated, there is still only a slim chance that Earth can be saved. Your mission is to enter Cyberg using the most sophisticated weaponry available, the M-308 Gunner, and unlock that self-destruct device!
M-308 Gunner
Height: 9 feet
Weight: 2100 lbs.
Material: Geopolyum Alloy
Generator Power: 1300 KW
Special Function: Gravity Flip

CONTROLS

 Shoot
Shoot Jump
JumpPress UP and A to perform the GRAVITY FLIP
Press DOWN and A to return gravity to normal

MECHANICS
The maximum jump height of the M-308 Gunner is very high, more than double the height of the mech, and the height is variable depending on how long the JUMP button is held. Even early in the game you’ll need to alternate between low, medium, and high jumps in order to successfully navigate the environments without taking damage.
Your default weapon is a machine gun that fires continuously when the SHOOT button is held. Only two bullets are allowed on the screen at once, but they move quickly. The weapon can be fired in 4 directions, including firing straight downward through platforms when ducking, allowing for some versatility in the player’s attack options.

Of course, the single most important mechanic available to the player is the gravity flip. The entire game is built around this mechanic, and like most 8-bitters, all possible variations of this mechanic are explored across the 7-stage adventure.
If the player holds UP on the D-pad while jumping, gravity will be reversed, and the player will stick to the ceiling. In reversed gravity mode, the mech retains all of its abilities, including jumping and 4-directional shooting. The game makes an important distinction that the mech isn’t magnetically attracted to the ceiling, but that gravity for the entire area has been reversed.

Enemies and environmental objects are impacted by the gravity flip as well. So when you encounter mechs that are walking along the ground, you can switch gravity to send them falling toward the ceiling. Alternately, some of these mechs walk along the ceiling while you are on the ground, and switching gravity will flip both of you, sending you to the ceiling, and sending the enemy to the floor. Pressing DOWN on the D-pad while jumping will return gravity to normal.


It’s also important to note that you can only perform a gravity flip once while in midair; you have to wait until you land before you can use it again. This prevents infinite flipping that would essentially allow you to hover through the level.
Mastering the gravity flip mechanic in Metal Storm is as necessary to your survival as mastering the bionic arm in Bionic Commando. Sure, you can plod along and perform the basic moves, but later levels will decimate you if you cannot react quickly enough and perform some precise techniques.

For instance, there’s a spot in the second stage with a 1UP tucked in a corner. Both the floor and ceiling leading to the 1UP are lined with spikes, and it’s not possible to jump the full distance over them. What you need to do is jump halfway across, and as you start to plummet toward the spikes below, switch gravity and start falling upward, pressing to the right to avoid landing on the spikes above. Granted, this is an optional pickup, but it’s a good example of the types of techniques you are expected to master in the later stages.


Much of the game’s environmental navigation is determined by gravity as well. Throughout the game, there are several types of platforms that you can jump through, as long as gravity is aimed in the correct direction. There are 3 types of platforms:
Platforms with both up and down arrows can be jumped through from either side, regardless of whether gravity is reversed or normal. These are introduced in the first level.

Platforms with up arrows can only be jumped through from below while gravity is normal. These work similarly to the standard 1-way platforms that you’re used to seeing in the genre, except that once you’ve passed through, you’re stuck on the far side; there’s no pressing DOWN + JUMP to fall back through them.
Platforms with down arrows can only be jumped through from above while gravity is reversed. This is basically the same as above, but backwards.

Powerups
The player is offered a few powerups to assist him in his journey. Interestingly, each of the powerups cancel each other out, so only one can be equipped at a time. Also, each of them is infinite, so you retain the powerup it even if you take damage or get killed. However, you will lose the powerup if you use a continue.
Knowing which powerup is best for a given situation (or boss) is very important, as some levels become much more difficult if you are not optimally equipped. For instance, stage 4 places you inside of a rectangular box in the center of the screen with enemies entering from all sides. With the proper powerups, you can shoot the enemies before they breach the box, or plow right through them as they move above or below you. Often, you’ll be placed in situations where you’ll be presented with a forked path that forces you to choose between two powerups, or between a powerup and a special item. Unfortunately, it can be difficult to make this decision if you don’t know what dangers lay ahead.

 The Shield Force deflects bullets and damages enemies, but it is useless against laser fire. It can be aimed in any of 4 directions, and it remains in the last direction you pressed on the D-pad. As such, you’ll need to be careful when doing gravity flips, because the shield will end up aimed toward your feet when you land.
 The Power Beam is a somewhat more powerful version of your standard machine gun, and the beam is wider, which makes it easier to hit your targets. Where the weapon really excels is in its penetration ability. Your standard weapon can shoot through platforms, but the projectiles stop when they hit a solid object. The Power Beam can fire through any object, allowing you to take down enemies on the far sides of walls.
 This is an interesting powerup that is useful for frequent gravity flippers, and it can come in handy during some of the boss encounters as well. When you are equipped with the Gravity Fireball, you become indestructible whenever you flip gravity, turning you into a fireball that shoots across the screen and damages any enemies that it touches in the process. This powerup will allow you to decimate some tough targets by fireballing straight through them, and it lets you easily slide through a hail of bullets unscathed, making it a great last-minute lifesaver.
Special Items
In addition to the powerups, there are a few special items to be found as well.
 The Armor pickup is the single most useful special item in the game, and it’s even more useful than the powerups. In its default state, the M-308 Gunner is not capable of absorbing any damage. If you get hit by one bullet, run into one enemy, or take damage from any environmental obstacle, you die instantly. That’s right, mankind’s last hope and the “most sophisticated weaponry available” is a mech that cannot sustain so much as a paper cut without exploding magnificently.
The Armor pickup allows the mech to sustain one hit of damage without being destroyed. Of course, it still explodes if it is hit a second time. The player sprite is also altered to show this armor enhancement, which is a nice touch, and it lets you look and see if you’re one hit away from death, or two.
![]()
![]()
 The Bonus pickup is worth 5,000 points.
 The Crusher is a screen-clearing bomb. It is used immediately upon pickup.

 The Extra Time pickup adds 100 seconds to the game’s timer. That’s right, levels are timed. Generally speaking, there is plenty of time to make it through each of the levels without worrying that the timer might run down. It is primarily in place to urge the player along and keep him from being too methodical. In other words, you still have to be quick on your feet with the gravity flipping mechanic; you cannot rely on plodding slowly along.
If you die after the mid-stage screen transition, you will return to the start of the substage with half of the full-stage time remaining. Most stages give you 400 seconds to complete them (or 200 seconds if you restart from the midpoint). When you get down into the last 30 seconds, the timer will start flashing and a chime will sound with each second that ticks away. If it reaches zero before you make it to the boss (where the timer disappears), the mech explodes. There is no direct in-game explanation for why you only have 400 seconds to complete a level, although you are on a quest to stop a laser from destroying the Earth, so you are at least in a hurry.

 Well, if you don’t know what a 1UP does by this point, there is probably no helping you. You begin the game with 3 lives, and you may (infrequently) gain more. Using up all of your lives will return you to the beginning of the substage with 3 more lives. You have infinite continues, and there is a password system in place as well, which retains your life count and any powerups you had at the time. A password is given each time you clear a stage.
The game’s difficulty ramps up evenly from the first level onward, but players may find even the first step to be a difficult one. The first stage is set up like a test area, giving you plenty of opportunity to test the limits of your weapons, your jumps, and most importantly, the gravity flipping mechanic. It definitely takes some work to get used to the controls, but once you’re skilled enough to run through the first level without getting killed, you’ll find that you only have to deal with one or two new obstacles with each level that follows.

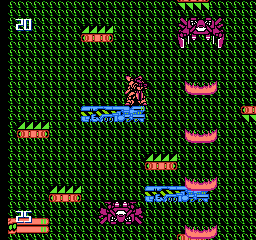
The first stage has a defined floor and ceiling, but the second stage does away with this, creating an infinite vertical environment. Here, the floor is the ceiling and the ceiling is the floor, and you can step off of a platform and fall down to land back on the same platform again. There are even a few infinite-drop sections where you can fall forever until you move to the left or right and land on a platform.


This type of level design really forces you to consider the environment as you navigate. An enemy above you could be destroyed by flipping gravity and standing next to it, but it would be easier if you jumped up through the platforms to get under the enemy instead.


The second stage also introduces gravity flip doors that swing 90 or 180 degrees when gravity is flipped. If you happen to be touching a door while it’s flipping, you’ll be killed instantly. So you need to consider where the door is, where it’s going to be when it moves, and where you need to be in relationship to it. Also, when you’re opening one path, you’re blocking another. You’ll start by simply flipping the door, moving past it, and then flipping it back, but you will eventually encounter a situation where you’ll need to jump through an opening and flip gravity in midair, closing the door behind you without catching yourself in it.


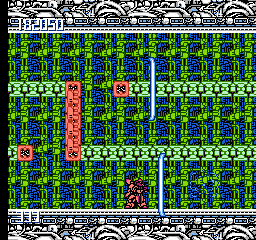
You’re able to rest your mind a bit when you get to the third stage, which once again presents you with a defined ceiling and floor. However, you’ll also find a number of sections where the floor is lined with spikes, so you’re forced to figure out how to proceed with limited the use of gravity flip in these situations.

A track is running down the center of the screen throughout the level, and an endless stream of predictably-spaced enemies will approach you on the track as you progress, which you can shoot down. To make it through the stage, you’ll need to time all of your jumps and gravity flips around the spacing in the enemies.

To further force you to one side of the screen or the other are a handful of laser-firing crabs (yep) that will only fire when gravity is reversed. The laser walls also block your bullets, making the enemies on the track more dangerous, as they can get closer to you before you can destroy them. Return gravity to normal, and the lasers shut off and do nothing. Thus, you have to stick to the ground and move past the crab before flipping gravity again, lest you find yourself being shucked for your meat.


Stage 4 changes things up drastically. Here, the M-308 Gunner is confined to a rectangular box (the instruction manual states that this is a cargo elevator, although it is free-floating). The box scrolls through the level of its own accord, making for a pseudo-shmup experience. You are free to perform as much gravity flipping as you like, and you can move freely about the box, but you have no control over its path of travel.
Enemies will be scrolled into the box as it moves, and you’ll be forced to deal with them. Gravity has no impact on free-floating enemies and mounted turrets, so gravity flipping only acts as a means for you to dodge their attacks. As mentioned above, having the Gravity Fireball is very handy because it allows you to transition between the top and bottom of the box without taking damage (and potentially destroy enemies along the way), and one of these powerups is available at the start of the stage. Still, you’ll have to balance this with shooting and dodging within a moving box that you cannot control, so it’s definitely possible to miss a valuable powerup.

In substage 4-1, the box will alternate between moving up, down, and right. Substage 4-2 adds diagonals, making it more difficult to track enemies. Things can become pretty challenging when you’re moving toward enemies diagonally, particularly since your mech is unable to fire diagonally. It’s important to react quickly and position yourself properly if you hope to engage or avoid enemies. Also, the box in 4-2 is solid, meaning that your regular shots will not penetrate it. If you don’t have the Power Beam upgrade, you won’t be able to shoot any enemies until they scroll into the box with you.

To make matters worse, this is the only level in the game that has two bosses, and it has some of the most bastardly enemies in the game, including Insta-Death Robot Walls (which are covered in detail in the BCE section below) and little crab-like enemies that scroll around and then suddenly zoom toward you. In addition to these, there are turrets in this area that fire boomerang-shaped projectiles at you (which fortunately do not reverse direction in midair). Things become more difficult when you blow up a turret only to find that it can regenerate after a few seconds and toss another boomerang at you. So, you’ll need to avoid their shots or plan to destroy them twice, lest you be hunted like a deadly space kangaroo.

Stage 5-1 is a race, but not against the clock (although there is still a timer). Instead, you’ll be attempting to outrun a huge wall of electricity that will kill you instantly if you touch it. The electrical wall runs the full height of the screen, and it moves slowly and persistently from the left to the right. What lies ahead is the most complex arrangement of platforms, turrets, and enemy fire that you have yet encountered, and the impending threat of the wall ensures that you have limited time to consider your options before moving forward. If you have not yet mastered the controls, you will invariably be forced into doing something foolhardy, which will result in a gorgeous M-308 fireball.

Spread throughout the area are laser-firing turrets that can shoot either horizontally or vertically. They adjust their firing direction based on your position relative to their axis, and their shots can travel the length of the screen. You’ll need to consider whether it’s prudent to destroy the turrets or simply run past them between volleys in an attempt to put some more distance between you and the electrical wall.

There are situations where turrets block your path entirely and you will have no choice but to destroy them to continue. The Power Beam is very useful in this area because it is strong enough to destroy a turret between laser volleys. With your default weapon, you’ll need to fire off a few shots, dodge the oncoming laser blast, and then fire a few more to destroy it.

The sixth stage is very much like the second… only its presentation is meant to mess with your mind. Rather than the screen scrolling up and down based on your mech’s position, the “camera” is locked, but the entire level is constantly scrolling upward off the top of the screen.


Structurally, it’s the same type of layout; you can drop off of a platform to fall down and land on the same platform again. But the constant scrolling makes it a bit more difficult to process what’s happening. To further complicate matters, the platforms are smaller and the enemies are far more plentiful, so finding a safe vantage point from which to engage your targets is more difficult.

You’ll be dealing with mounted turrets, flying enemies, and platforms that have spikes on one side. There are also some more of those laser-firing crabs, only this time some are facing upward and some are facing downward. This forces you to tackle certain areas with gravity aimed in a specific direction. Some of the laser crabs are even placed close together so that you’ll need to jump away from the first, reverse gravity in midair, and fall next to the second.
This final escalation in difficulty requires all of your gravity flipping prowess to succeed, as well as a pretty good mind for spatial reasoning and upside-down thinking in general. From here, there are no new tricks to learn, although beating the final boss will give you a password to start the game again on expert mode.
Irem is known for providing super hard modes in many of their games, and this is no exception. In expert mode, the enemies take more hits to kill, there are more of them, and they move more quickly. Also, some of the more difficult enemies from later levels make earlier appearances than normal, and some of the earlier enemies gain the ability to fire projectiles. Bosses take more hits and have more attacks, and the timers for completing the stages are shorter as well. Even if you have managed to completely master the controls of the M-308, you will find expert mode to be extremely challenging.
BASTARD CLASS ENEMIES (What's this?)
Insta-Death Robot Walls Stage 4 is home to the most dangerous foes you will face outside of the boss encounters themselves. Toward the end of the stage, you will encounter little robots that have walls extending out of their tops and bottoms. You have to attack the robot at the center in order to destroy the wall, but you have a limited time to do so.


The box/elevator in which you are confined keeps scrolling forward, and if you can’t destroy the enemy before it reaches you, you will be instantly killed, even if you had the Armor equipped. To make things a bit more challenging, the robots in the center of the walls can fire projectiles at you, meaning that you can’t just pump screaming fire into them until they die; you have to do some dodging as well.

Then, just when you think the worst is over, two walls appear at the same time, one on the left side of the box and one on the right. You have a very limited range of movement, and you really need to focus all of your firepower on one of the robots just to clear enough space for you to get away from the other and dodge the oncoming projectiles. A combination of shooting, gravity flipping, and unbridled button-hammering panic will see you through this battle.

The Flying Laser Birds Stage 5-2 introduces bird-like robots that fly quickly across the screen in a straight line. They’re a bit difficult to dodge, particularly if you don’t know they’re coming, but they’re even more dangerous to shoot.

If you shoot one of these birds, it will emit a widening laser that moves across the screen like a deadly wall, cutting a wide swath of potential destruction. At full height, the laser is nearly impossible to avoid since it can block an entire passage, or overlap into an adjacent passage. So basically, you need to dodge, not shoot.

However, if you don’t shoot the bird down, it will still fire a laser at you when it nears the left edge of the screen. This is the same type of laser, only moving in the opposite direction. However, if you had the wherewithal to doge the bird, then you will at least be positioned above or below it, giving you a bit more time to dodge the laser wall. Laser bird droppings always seen to happen right after you’ve given your M-308 a good washing.

BOSSES
Boss fights in Metal Storm are always difficult on your first attempt, due to the fact that your mech is destroyed instantly when it is hit (or after two hits with the Armor powerup). This means that you won’t have much opportunity to learn the bosses’ patterns and weaknesses. And if you can’t figure them out before you run out of lives, you’ll be starting the stage again from scratch. If you are killed during the boss fight, you’ll start again from the beginning of the fight.
Once you have learned the weaknesses of the bosses, things become much easier. In fact, a knowledgeable player can get in a few quick hits on many of the bosses at the start of the fight. Each end-boss is preceded with a “RED ALERT” message, after which the boss will be introduced, but it will not start attacking right away. However, the player is free to move about and fire, giving him the opportunity to knock some precious life from the boss before the battle officially begins.
Boss fights do not have a countdown timer, so you are free to dodge about, and whittle your opponent’s health down. Most of the bosses will speed up once they have taken a sufficient amount of damage.

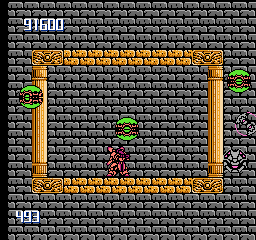
Stage 1: Gorgoth
Gorgoth is a metal monstrosity that is mounted to the ceiling. At the start of the battle, it exposes its core via the lower opening, which is its weak point. The core retracts and alternates between the boss’ 3 openings: one on the bottom, one on the upper left, and one on the upper right.

You can shoot upward to hit the core when it’s exposed via the lower opening, but you’ll need to gravity flip to reach the upper openings. A purple eye at the center fires rings at you – 3 per volley – but these move slowly and are fairly easy to avoid. In expert mode, these projectiles have loose tracking, which makes them more difficult to dodge as they seek you out.

Because the core alternates between each of the openings, you can take things slowly and just wait for the core to be exposed via the lower opening, or you can actively go after it by flipping up to the ceiling to attack the upper openings. It’s also worth noting that you will not be harmed if you gravity flip onto the body of the boss itself; you are free to walk around on it without taking damage.

Stage 2: Energizers
The boss room here has a fixed horizontal width, but it scrolls infinitely on the vertical. On the right side of the room is a series of laser-firing Energizers. There are only 5 of them in total, but the infinite vertical scrolling makes it appear at first that there is an endless line of them extending out of the top and bottom of the room.

When an Energizer opens – for which there is a very smooth animation – it will fire a wide laser straight across the room. The only way to avoid it is to jump to the next platform, but you need to be especially careful if two of the Energizers are firing at once, because you could potentially be jumping directly into another’s line of fire. As the battle continues, you’ll be facing increased firing speeds and more concurrent firing. In expert mode, multiple lasers fire simultaneously from the start of the battle, and their firing rate is much higher.

The most important thing you need to accomplish during this battle is to destroy one of the Energizers, which will give you a safe point from which you can attack all of the others. Until this is accomplished, it is perfectly reasonable to simply fire as many bullets as you can while jumping away whenever a laser is fired.

Once you have destroyed one of the Energizers, you can perform a medium jump into the next platform. This will allow you to fire a few shots at the next Energizer without standing directly in its line of fire. With this method, you can slowly ascend the structure and take out each Energizer one by one.

Alternately, if you are equipped with the Power Beam, you can simply stand below the Energizer and fire upward as it extends, allowing you to destroy each of them without even moving, thus making the remainder of the battle quite easy.

Stage 3: Gultzen
You really need to be aware of your surroundings during this battle, because Gultzen is very mobile. It has a pair of indestructible hovering satellites that greatly extend its reach, and a stream of long, slow-moving laser blasts is constantly being sent down the center of the room, from bottom-to-top and from right-to-left, essentially cutting the room into quarters. In expert mode, the satellites revolve around Gultzen much more quickly, making it more difficult to inflict damage on it.

Gultzen will appear in a circle in the upper left quadrant, and then it will move to whichever quadrant you happen to be standing in. It continues this cycle, moving from one quadrant to the next, pausing for a second, and then moving on.

This battle is a delicate balance of luring Gultzen toward you, and then attempting to dodge through the gaps in the lasers to get away from it before it reaches your quadrant, all the while firing as many shots into it as possible. Gultzen cannot be harmed while moving, so you have to wait until it stops in one of the 4 circles.

If you are equipped with the Gravity Fireball, this battle is much easier. You can simply stand below Gultzen, lure it toward you, and then fireball up to the ceiling as it passes. From there, you can keep luring it back and forth until it is destroyed. Without this powerup, a hit-and-run method seems to be your only option. If you are fast enough, however, you can actually move your mech within the limits of the spinning satellites and cause continuous damage without Gultzen having the ability to leave the quadrant.

Stage 4 Sub-Boss: Galons
This is the game’s only sub-boss. It is not preceded by a “RED ALERT” message, but the clock does disappear during the fight. The fight takes place inside of the floating box/elevator to which you are confined for the length of Stage 4. As such, it is a very close-quarters battle.

At the start of the battle, there are 4 Galons, one attached to each wall of the box, and all aimed toward the center. After a few seconds, they will begin to move clockwise around the box, speeding up as they go. Then they will slow to a stop, and each of them will fire a spinning projectile in a straight line in whichever direction they are facing. The more of them there are, the harder it will be to dodge all of their shots. After they have fired, they will begin moving counterclockwise, and will repeat this pattern for the duration of the battle.

You must avoid not only the Galons’ projectiles, but also the Galons themselves as they move about the room. The variable jump height is very important here, because you don’t want to jump over one of them only to ram headfirst into another.

While they’re moving, it’s best to keep hopping while attempting to focus your fire on one or two of them, and you’ll definitely want to lay on the SHOOT button whenever they’re stopped. After you’ve taken down one or two of the Galons, things get much easier.

Stage 4 End-Boss: Kridon and Zoniar
This is another close-quarters battle within the confines of a rectangular box. Inside the box with you is something that looks like a red mechanoid heart. It bounces around off the walls of the box, leaving you very little room to maneuver around it. Outside the box is a pair of turrets, one above and one below, and these travel back and forth firing long lasers into the box. In expert mode, the heart bounces around more quickly.

It is difficult enough to avoid the bouncing heart, but keeping track of its position while avoiding the lasers can be quite difficult. You also need to be careful where you’re standing in relation to both of the turrets, because it’s possible for them to engage and then press you back into a wall – or for both of them to come together – placing you in a no-win situation. The lasers themselves block your projectiles, meaning that you may be positioned safely away from the bouncing heart, but unable to cause it any damage.

You must destroy the heart in order to beat the boss, but this is a battle that varies in difficulty greatly depending on the powerups and special items you bring to the fight with you. For instance, the box is solid, meaning that your regular shots will not penetrate it. If you are equipped with your default weapon, you’ll be stuck dodging laser fire while you attempt to line up shots on the heart.

However, if you have the Power Beam, you can fire through the walls of the box, allowing you to destroy the laser turrets (though the second turret will start to fire more quickly once the first is destroyed). If you destroy both turrets, the boss battle is a cakewalk, because the heart has no offensive abilities. You just need to walk around and shoot it until it explodes.

Oddly, if you are equipped with the Armor, you don’t even have to fight. If you come in contact with the heart while wearing the Armor, it will be destroyed immediately for an instant win. This seems to be a programming bug rather than a strategic measure, because it only works in this one instance; when you fight the boss again in Stage 7, this strategy does not work.

Stage 5 Boss
This battle takes place against a transforming robot that can change into 3 different forms. All 3 forms are hovering ships with similar designs, but each is a different color and has a different laser pattern. Each type of laser will block your fire, making it more difficult to get shots in on the transforming robot. In expert mode, the firing rate of each form is increased.

The first form you will encounter is the blue ship, which is able to fire a series of lasers diagonally. These lasers bounce off of the floor and ceiling until they leave the screen to the left and disappear.

The second form is the red ship which fires lasers orthogonally. These lasers fire straight forward, and then turn in a 90 degree angle when they reach your position on the X axis. One laser will move straight downward and the other will move straight upward until they disappear off the sides of the screen.

Next is the green form which fires wide lasers that move horizontally. You’ll need to jump over or duck under these, or switch gravity to get to the opposite side of the screen. In any case, you’re going to want to keep firing at the robot.

Once you have caused enough damage, the robot will begin switching rapidly between all 3 forms, each firing its own variety of laser, but now firing them in pairs instead of single shots. This means that you can have more than one type of laser fire on the screen at a time, so you’ll need to take extra consideration as to which direction you need to dodge, lest you find yourself boxed in and destroyed.

Stage 6 Boss
Now here’s a boss that you won’t beat on your first attempt. In fact, you are very likely to die about 2 seconds into this battle if you aren’t ready, because you’ll be driven headfirst in to a laser wall unless you start moving right away. Even if you manage to avoid this sudden death scenario, you’re still very likely to do something silly that will prevent you from winning the battle, such as destroying one of the moving blocks prematurely and leaving yourself no safe place to stand.

This battle consists of 3 large blocks which move along the outer edge of the room counterclockwise. The floor and ceiling are both protected by a streaming laser that will kill you if you touch it, which means that you cannot fall off of the blocks and you must avoid jumping too high from one block to the next. Also, the blocks are not evenly spaced, so you’ll have to alternate between short and long jumps as you attempt to deal damage.

So, the only safe place for you to stand is on the moving platforms… but they’re also the boss, which means that you’re there to destroy them. If you don’t do things correctly here, you will inevitably be killed.

Each block has a panel in the upper-left corner that opens periodically. You can only harm the block while the panel is open. This design does two things: it makes it more difficult and time-consuming to destroy each block, but it also prevents you from accidentally destroying a block with continuous fire and leaving yourself with nowhere to stand.

Remaining calm and patient is the key to winning the battle, as you don’t actually have to dodge any kind of projectiles or other attack; you simply need to survive by hopping from one block to the next without killing yourself in the process. You also need to deliver an equal amount of damage to each block so that you don’t destroy one prematurely. In expert mode, each of the blocks takes a different amount of damage to destroy, so you need to be even more careful about destroying one too early.

After each of the blocks sustains enough damage, it will turn from green to purple. You’ll want to get each block to turn purple, and then prepare the final blow. You will need to destroy both of the blocks that you’re not standing on, followed by the one that you are. You don’t have to worry about falling down onto the laser, because when you destroy the final block, you’ll be met with a series of explosions and be transported to the final level.

Stage 7: Self-Destruct Device
The final encounter is against the Self-Destruct Device, but first you must face off against the bane of the 8-bit action game world… the boss rush. Boss rushes are included in modern games generally as an optional mode that lets you test your prowess against a series of the most difficult foes the game has to offer. But in the early days, a boss rush was just another way to make the last stage all the more difficult, without requiring any additional programming.

At the beginning of the stage, all 3 powerups will be presented to you. You can select between the Power Beam, Gravity Fireball, or Shield Force, whichever you think will be most advantageous in the upcoming fights. You will not have the option to get another powerup during the six consecutive boss fights (the sub-boss from 4-1 is not included here).

Each boss fight is 100% identical to your original encounter, including the same backgrounds. There are no transition areas between boss fights, and no downtimes; as soon as one boss is destroyed, you will be instantly transported to the next.
Finally, after wrecking the dreams of six bosses in a row, you reach the final challenge… which requires practically no skill whatsoever. The final boss has no offensive abilities and simply needs to be destroyed within the limits of the 30 second timer.


The Self-Destruct Device is a long metal thing with 4 modules along the side. When the battle begins, the first module will appear. You can jump and shoot at it, or simply walk underneath and unload your weapon into it. Once the first is destroyed, the device will slide out a bit further, exposing the next. This repeats until all 4 modules are destroyed. In expert mode, the Self-Destruct Device is capable of firing projectiles periodically – one high and one low – but they are not terribly difficult to dodge; it just means that you need to stand back and fire from the left side of the screen instead of walking directly beneath each module. After you destroy the first 2 modules, it will start firing 4 projectiles instead, but the dodging pattern is the same.
Wake up, it’s time for the ending text scroll!

HERITAGE
Why this game should be part of your 2D heritage:
- A well-designed gravity flip mechanic that is integrated into core gameplay for the duration of the game
- Clever level designs explore the permutations of the gravity flip mechanic in challenging ways
- Level variety frequently changes the way the player must engage the environment
- Precise controls which must be mastered in order to succeed
The downside:
- Difficulty level can vary greatly depending on the type of powerup you have, requiring foreknowledge
- Single-hit deaths punish experimentation


5 comments:
As a retro gamer I like the fact that good mechanics just don't expire. Didn't know that VVVVVV just rehashed a 20 year old mechanic. Or they didn't know it was done before. :)
Well done, as ever!
Cheers,
hermitC
www.nordenfelt-thegame.com
Such a good game, love the mechanics, and very very complete review of it, very impressive of you!
Just started doing an LP of this game. Excellent write up. Loved this game, last NES cart I ever bought.
You've gotta love that cameo from the R-Type battleship in the background, too!
Indeed. It's interesting that IREM decided to put the R-type battleship in the background of a boss fight rather than having it feature more prominently in the game itself. Still, it's a nice little reference.
Post a Comment